Broiler brooding is the job of keeping newly hatched chicks warm, fed and watered for their first two weeks, before they can control their own body temperature — and it is the single stage that decides how heavy your birds finish. Start with house air around 30–32°C at chick level (with a warm spot near 32–34°C under spot brooders), drop it gradually to about 21–22°C by four weeks, and prove it is working by checking that at least 95% of chicks have full crops 24 hours after placement. In a Ghanaian house the danger runs both ways: a cold harmattan night can chill a chick, but a still, humid afternoon can overheat one just as fast. A chick that is chilled, cooked, or slow to find feed and water in its first 48 hours never fully catches up — which is why experienced farmers say the money in a broiler batch is made or lost in the first 14 days. This guide gives the temperature curve, the placement routine, and the checks that tell you brooding is on track.
Written by the Agro Prime Ghana hatchery team and reviewed against current industry references (Aviagen Ross and Cobb-Vantress broiler management guides). Last updated September 2026.
Key takeaways
Brooding covers roughly the first 14 days, when the chick cannot regulate its own temperature. Pre-heat the house at least 24–48 hours before chicks arrive so litter reaches 30–32°C and the floor beneath is warm. Target placement air of about 30–31°C at 60–70% humidity, with a warm zone near 32–34°C under spot brooders, then step temperature down about 2–3°C per week to ~21–22°C by day 28. Give light and access to feed and water immediately; use bright light (25 lux) for the first days. The proof brooding is working is crop fill: ≥85% of crops full at 8 hours, ≥95% at 24 hours. Read chick behaviour, not just the thermometer, and keep litter dry — good brooding sets the ceiling on final weight.
What is brooding and why does it decide final weight?
Brooding is the artificial warmth and care you provide to day-old chicks until they grow enough feathers and body mass to keep themselves warm — usually around two weeks. It matters more than any other stage because a newly hatched chick is effectively cold-blooded for its first days: it cannot maintain its own body temperature and relies entirely on the brooder for heat. At the same time, its appetite, gut and immune system are developing at the fastest rate of its whole life. Get warmth, feed and water right in this window and the chick eats hard, its gut develops fully, and it grows into the frame the breed intended. Get it wrong — a chilled night, an overheated afternoon, feed the chicks cannot reach — and you lose growth that cannot be recovered later, no matter how good the finisher feed is. This is the practical meaning of the industry saying that brooding "sets the ceiling": your best possible final weight is fixed in the first fortnight, and everything after that is about not falling below it. Brooding is stage one of the wider broiler management cycle.
The broiler brooding temperature curve
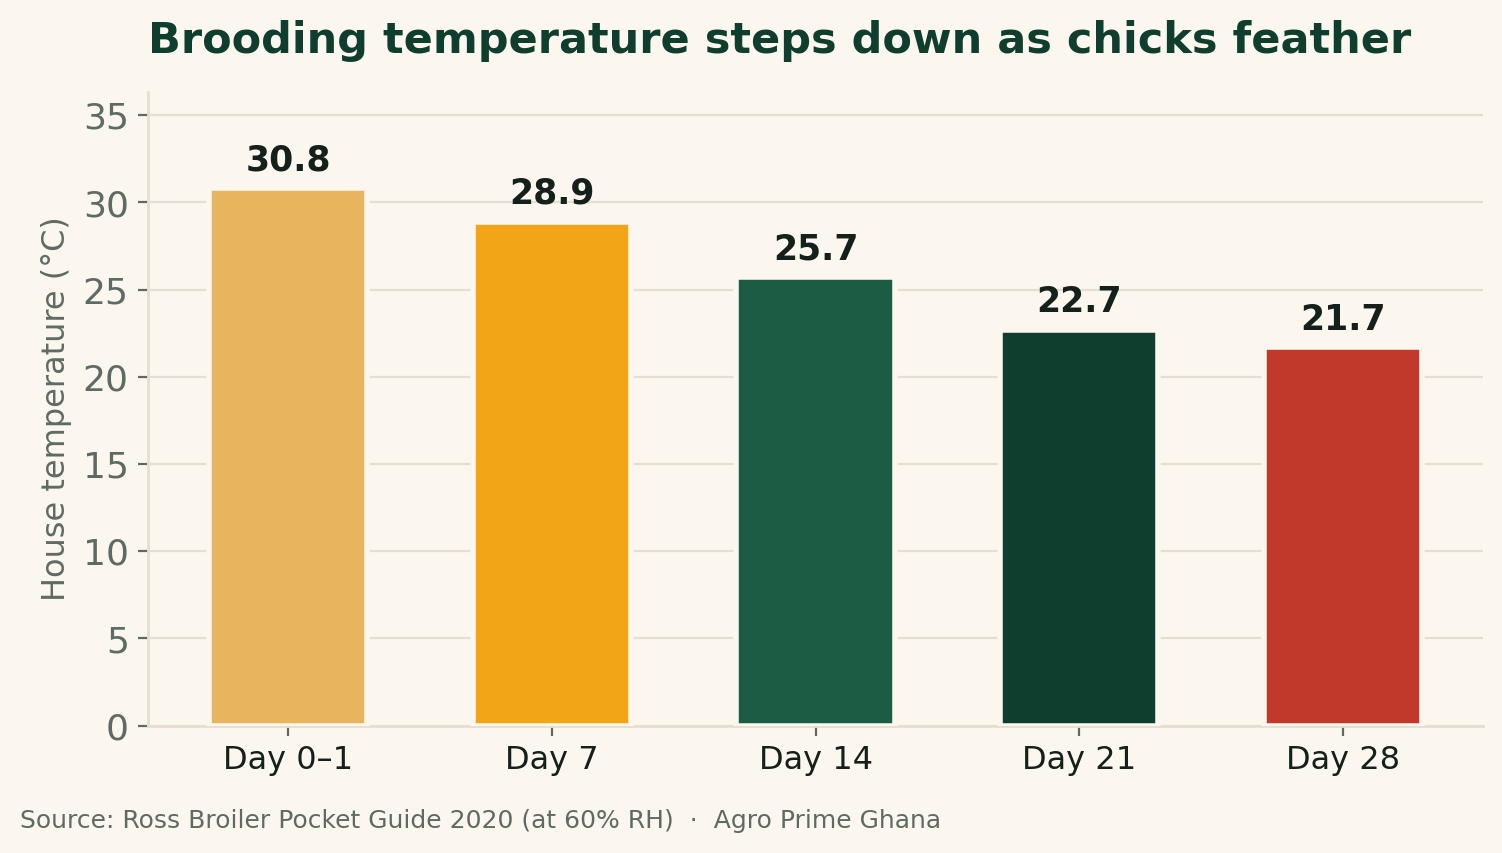
The core of brooding is a temperature that starts high and steps down as the chick feathers and grows. Chicks are placed into a warm house and the heat is reduced gradually over the following weeks. Aviagen's Ross figures put whole-house temperature at roughly 30–31°C on day one (measured at chick height, at 60–70% humidity), easing to about 29°C by day 7, 26°C by day 14, 23°C by day 21 and 21–22°C by day 28. Cobb's guidance is similar but reminds farmers that the right air temperature depends on humidity — in drier air you brood a little warmer, in humid air a little cooler — and lists targets from about 34°C at day-old down toward 21°C by four weeks. Under spot brooders (a heat source birds gather beneath, rather than a warmed whole house), the warm zone at the edge of the brooder is set around 32°C, with the litter under it at 28–30°C. The exact number matters less than the trend and the birds' response: the curve below shows the whole-house decline on Ross figures.
Read the chicks, not just the thermometer
The most reliable brooding thermometer is the flock itself, because chicks show you exactly how they feel about the temperature. A thermometer at the wrong height, a draught, or high humidity can all make the reading lie — the birds never do. Learn to read their spread across the floor:
- Evenly spread, active, feeding and chirping softly — temperature is right. This is what you want to see.
- Huddled tightly under the heat, piling on each other, cheeping shrilly — too cold. Chilled chicks stop eating and are prone to smothering.
- Pushed to the edges away from the heat, wings spread, panting, drowsy — too hot. Overheated chicks dehydrate and go off feed.
- Bunched to one side or avoiding a corner — a draught or a cold, wet patch of litter is driving them away. Find and fix it.
Adjust the heat to the birds, and check them last thing at night and first thing in the morning, when a Ghanaian house is at its coldest — especially during the harmattan, when clear night skies pull temperatures down fast. Our brooder temperature chart lays the full curve out day by day.
Field note: the cold floor is the hidden chick-killer
The mistake we see most often is a farmer who heats the air but forgets the floor. A chick spends much of its first days sitting down, and its belly — where the yolk it is still absorbing sits — is pressed against the litter. If that litter is thin and laid on a cold concrete or bare-earth floor, heat drains straight out of the chick even while the air thermometer reads fine, and you get chilled birds, pasty vents and early deaths that make no sense from the air temperature. That is why we pre-heat the house well before the chicks land and lay litter deep enough to insulate — a warm floor is as important as warm air. Put your own hand flat on the litter where the chicks will sit: if it does not feel comfortably warm, the chicks will be cold.
Before the chicks arrive: pre-heating and setup
Brooding starts before the chicks do. The house must be pre-heated so that both the air and, critically, the litter and floor beneath it are warm on arrival — Cobb recommends beginning to heat at least 24 to 48 hours before placement, aiming for litter at 30–32°C and the concrete beneath it at 28–30°C. A house heated only an hour before chicks arrive will have warm air over a cold floor, which is the classic recipe for chilled chicks. Alongside the heat, set up a defined brooding area — chicks are concentrated in part of the house near the warmth rather than lost across a cold floor — using a brooder guard or ring to keep them close to heat, feed and water. Lay clean, dry litter of good depth. Put down plenty of feed on paper or trays and fill drinkers with clean, cool (not cold) water so both are ready and reachable the moment birds go down. Round the corners of the brooding ring where practical, so chicks cannot pile and smother in a sharp corner.
Chick placement: the first hours that matter most
How you handle placement decides how fast chicks start eating and drinking, and speed here directly drives growth. Get chicks off the transport and into the warm brooding area quickly and gently, and place them straight onto paper where feed is visible. Ross advises letting chicks settle for 1–2 hours with immediate access to feed and water so they find both quickly and start their gut developing. Every chick should be able to reach a drinker and feed within a short walk — a chick that has to travel across a cold floor to drink often simply does not. Provide plenty of drinking points and feeding space so timid birds are not shut out by bolder ones. Bright light in these first days helps chicks find feed and water: Cobb recommends a light intensity of about 25 lux during brooding with essentially continuous light on the first day, before darkness is gradually introduced. Start your batch with vigorous chicks in the first place — see our guide on choosing healthy day-old chicks, because no brooding can rescue weak, poorly hatched stock.
Crop fill: the test that proves brooding is working
Crop fill is the single best objective check that your chicks have actually found feed and water, and it takes only minutes. The crop is a soft pouch at the base of the neck where feed and water collect; gently feel it on a sample of chicks picked at random from around the brooding area. A well-fed, well-watered chick has a full, soft, pliable crop. Targets from the breed guides are clear: at 8 hours after placement, at least 85% of chicks should have both feed and water in the crop, and at 24 hours, at least 95% of crops should be full, rising toward 100% by 48 hours. A crop that feels hard and pebbly means the chick has eaten feed but not drunk enough water — a drinker problem. A crop that is swollen and watery means it has drunk but not eaten — a feed-access problem. Empty crops in many chicks means they are not finding either, and you must act at once on temperature, lighting, or feeder and drinker placement. Checking crop fill the evening of placement and again the next morning turns brooding from guesswork into something you can measure and fix.
| Check | Target | What it tells you |
|---|---|---|
| Crop fill at 8 hours | ≥ 85% of chicks with full crops | Chicks are finding feed and water quickly |
| Crop fill at 24 hours | ≥ 95% of chicks with full crops | Whole flock is eating and drinking well |
| Hard, gritty crop | — | Eating but not drinking: check drinkers, water flow, height |
| Swollen, watery crop | — | Drinking but not eating: check feed access and lighting |
| Empty crop | — | Not finding feed or water: check heat, light, layout urgently |
Ventilation versus heat: the balance you must strike
The hardest judgement in brooding is trading off warmth against fresh air, because chicks need both and the two pull against each other. Keep the house too closed to hold heat and you trap moisture, carbon dioxide and ammonia from the litter, giving chicks damp bedding, foul air and respiratory stress. Open it up too much for fresh air and you chill the birds and waste heat. The goal is minimum ventilation — enough air exchange to keep the litter dry and the air fresh, without a draught blowing across the chicks at floor level. Cobb targets a relative humidity around 60–70% during early brooding; litter that is caking and wet, or an ammonia smell that stings your eyes at chick height, tells you ventilation is too low regardless of the reading. In Ghana's naturally ventilated open-sided houses, you manage this with curtains: closed at night and in cold harmattan winds to hold heat, opened progressively through the day and as birds grow. The rule of thumb — warm and stuffy is worse than fresh and slightly cool, but a draught on day-old chicks is worst of all. Our poultry house ventilation guide goes deeper.
Get brooding right from the start: strong chicks, a setup plan, the right feed
Brooding rewards preparation, and the two things that make it easiest are chick quality and a brooder plan sized to your flock. Agro Prime Ghana supplies robust broiler day-old chicks that start strong, along with quality broiler starter feed and a straightforward brooding setup plan — brooder size, temperature curve, feeder and drinker numbers, and lighting — matched to how many birds you are placing and the kind of house you have. If you are preparing for a new batch, message us before the chicks arrive so your brooder is ready on day one. Reach us on WhatsApp (+233 24 915 1503) or book a farm visit — a warm, well-set brooder is the cheapest insurance in poultry.
Weaning off heat and moving into grow-out
Ending brooding is a gradual handover, not a switch you flip. As chicks feather over the second week they need less supplementary heat, and you step the temperature down toward the low twenties, spreading birds out of the concentrated brooding area to give them the room they will need to grow. Move too fast — pulling heat before birds are feathered, or opening the brooding ring onto a cold floor — and you chill them and stall growth. Move too slow — holding high heat into weeks two and three — and you overheat birds, suppress appetite and drive the flock toward heat stress just as intake should be climbing. Let the birds guide the pace: keep reading their spread and behaviour, watch that they stay evenly distributed and active as heat comes off, and keep litter dry throughout. By around day 14, a well-brooded flock is feathered, evenly spread, eating hard and ready for the grow-out phase, where feed, water, density and health carry the birds to market weight. Track how they are doing against the broiler weight chart — a flock that is on target at day 7 and day 14 was almost always brooded well.
The bottom line on broiler brooding
Brooding is where a broiler batch is won. For the first two weeks the chick cannot keep itself warm and depends completely on you: pre-heat the house so the floor is warm before chicks arrive, place them quickly onto feed and water under bright light, hold air around 30–32°C with a warm spot near 32–34°C, and step the heat down gently as birds feather. Judge it by the chicks, not just the thermometer — evenly spread and busy is right; huddled or panting is not — and confirm it with crop fill, aiming for 95% full crops at 24 hours. Balance warmth against fresh air so litter stays dry and the air stays clean. Do this well and you set a high ceiling for the whole flock; do it badly and no finisher ration will buy the growth back. Everything else in broiler management builds on these 14 days.
Frequently asked questions
What temperature should a broiler brooder be?
How long do broiler chicks need brooding?
What is crop fill and why does it matter?
How do I know if my chicks are too cold or too hot?
Should I pre-heat the house before chicks arrive?
How much light do broiler chicks need when brooding?
Why do my chicks keep dying in the first week despite feeding them?
What relative humidity is best for brooding chicks?
Sources & further reading
- Cobb-Vantress — Cobb Broiler Management Guide (pre-heating, brooding temperatures, crop fill, lighting intensity, humidity).
- Aviagen — Ross Broiler Pocket Guide 2020 (house temperature curve, spot-brooding temperatures, humidity, crop fill, chick placement).
- Aviagen — Ross Broiler Management Handbook (chick management, placement and brooding setup).
- Agro Prime Ghana guides: broiler management overview, brooder temperature chart, choosing healthy day-old chicks, and poultry house ventilation.
About Agro Prime Ghana
Agro Prime Ghana Limited runs a poultry hatchery and mixed agribusiness in Kasoa, supplying day-old chicks and supporting poultry keepers across the country. These guides combine hands-on hatchery and farm experience with current industry references from Aviagen and Cobb-Vantress. This article is general educational information, not a substitute for professional veterinary or agronomic advice for your specific flock. We supply healthy broiler and layer day-old chicks, point-of-lay pullets, quality feed and hands-on farm support. Preparing a new batch? Book a visit or message us on WhatsApp (+233 24 915 1503) to order chicks, feed or a brooding setup plan.