A chick hatches or arrives looking perfect, but instead of standing squarely on both feet it sits with one or both legs sliding out sideways from under it — splayed flat like a tiny swimmer doing the splits — scooting on its belly, unable to get up to the feeder or drinker. This is spraddle leg (also called splay leg or splayed leg), and among Ghanaian keepers it is one of the most common and most heartbreaking day-old problems, precisely because it looks hopeless but usually is not. Caught in the first day or two, most spraddle-leg chicks can be fixed at home in a few days with a simple hobble and a better floor. Left alone, the same chick will starve because it cannot reach food and water. This guide explains what causes it, exactly how to tape and correct it, and how to stop it happening to the next batch.
Written by the Agro Prime Ghana poultry team and reviewed against current veterinary references (poultryDVM and current hatchery guidance). Last updated September 2026.
Key takeaways
Spraddle (splay) leg is when a chick's legs slide outward from the body so it cannot stand, most often caused by a slippery brooder or incubator floor (bare newspaper or smooth plastic), by incubation faults (wrong temperature or humidity), by chilling and piling, or by a vitamin/riboflavin-poor breeder diet. It is mechanical and, caught early, very fixable: fit a soft hobble that holds the legs a natural distance apart (a short piece of bandage or vetwrap, or a plaster "figure-of-eight"), stand the chick on a non-slip surface, and most chicks learn to stand within a few days — often 2–3. The younger the chick when treated, the better the outcome; longstanding cases may not recover. Prevention is cheap: a grippy floor (paper towel or rubber shelf liner, never bare newspaper), correct incubation, and steady brooder warmth.
What spraddle leg actually is
Spraddle leg is a description of a position, not a single disease. The chick's hip and leg are not yet strong or coordinated enough to hold the leg underneath the body, so one or both legs slip out to the side and the chick sits flat, unable to get its feet under it to push up and stand. According to poultryDVM, the leg splays outward from the body and, in severe cases, the chick cannot stand or walk at all. It is important to understand what it is not: it is usually not a broken bone, and in most cases it is not a permanent deformity — it is a weakness-plus-slippery-floor problem in a chick whose legs simply have not firmed up. That is why the fix is mechanical: hold the legs in the right place, on a surface the chick can grip, and give the muscles a few days to catch up. Spraddle leg also often travels with curled or crooked toes, another day-old leg problem, and the two are sometimes tackled together, though their fixes differ slightly.
Why it happens — and why it is common here
Several things cause spraddle leg, and on a typical Ghanaian small farm more than one is often at play. poultryDVM groups the causes clearly:
- Slippery flooring. This is the classic and most preventable cause. As poultryDVM puts it, smooth surfaces such as newspaper prevent proper traction, causing the legs to slide outward. A newly hatched chick on bare newspaper, glossy plastic, or a smooth incubator tray simply cannot get a grip, and the legs skate apart.
- Incubation faults. High humidity or inconsistent temperature during incubation interferes with normal leg development, so chicks hatch already weak in the legs. Temperatures that run too high or too low both do damage.
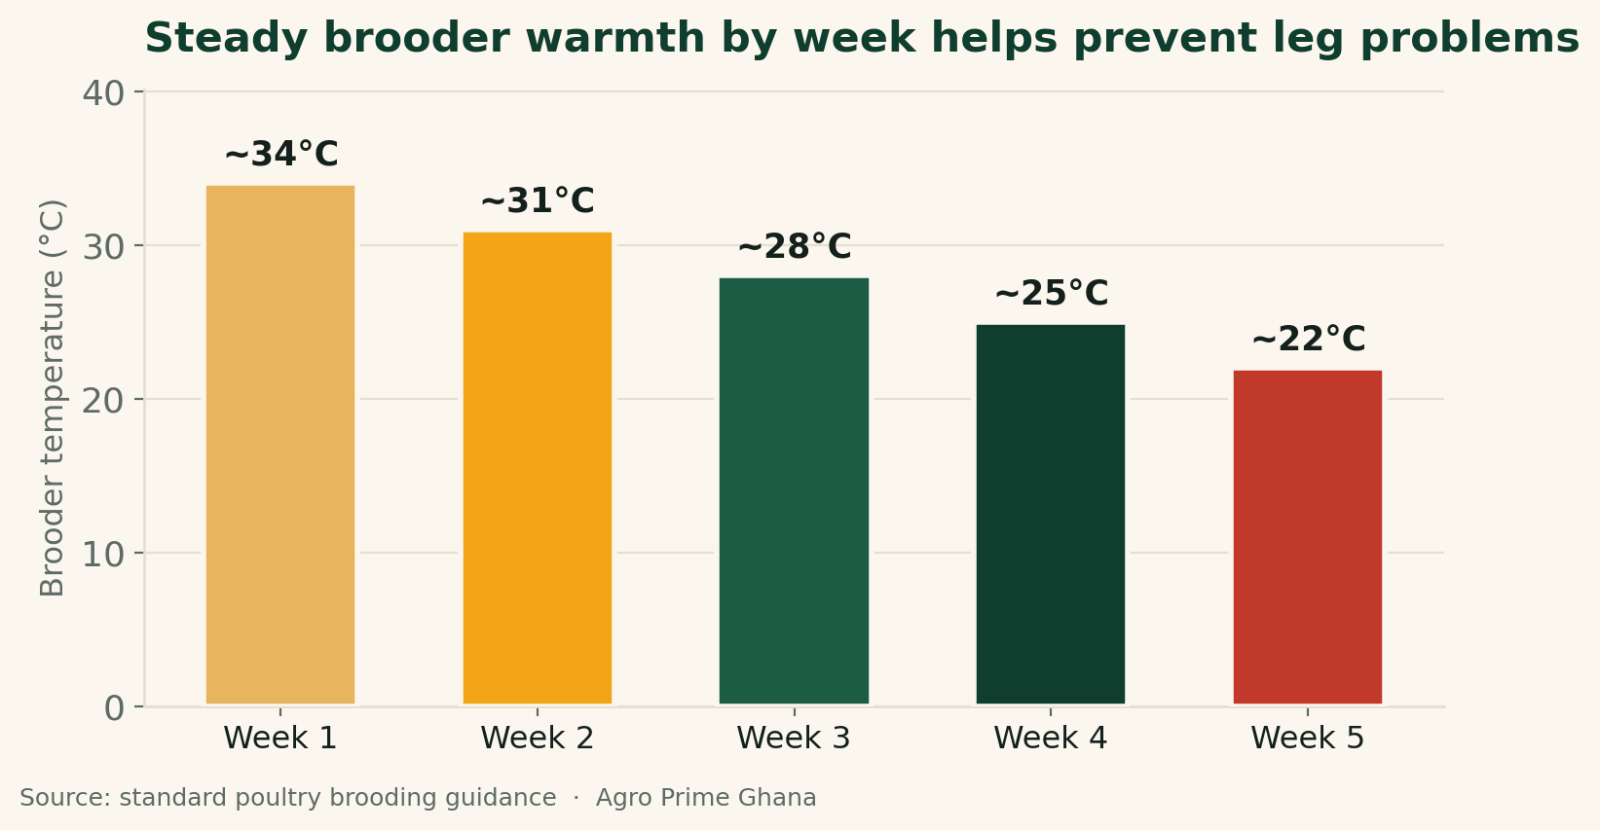
- Chilling and piling. A chick that is cold sits, huddles and gets trampled by pilemates; pressure on splayed-out legs makes the problem worse. Steady, correct brooder warmth keeps chicks upright and active.
- Poor breeder nutrition. poultryDVM notes that a breeder flock fed a diet not properly formulated — for example an ordinary layer ration rather than a breeder ration — can produce chicks with vitamin B-complex deficiencies (including riboflavin) that weaken the legs and feet from the start.
On many farms the trigger is depressingly simple: chicks brooded on a smooth cement floor covered only with slick sacks or newspaper, in a brooder that runs a little cold at night so chicks pile. Fix the floor and the warmth and most of the problem disappears.
Recognising it early — and why hours matter
Spraddle leg is easy to spot: a chick sitting with a leg (or both) sticking out sideways, unable to stand, often paddling or scooting to move. The urgency is the important part. A splayed chick cannot reach the feeder or drinker, and poultryDVM is blunt that, untreated, such a chick can die from inability to get to food and water. Just as important, the correction works best while the chick is tiny and its legs are still soft and mouldable — the same source and hatchery guidance agree that the younger the chick when treated, the better the chance of preserving normal leg function. So this is not a "watch and see" problem. If you find a spraddle-leg chick in a fresh hatch or a new batch, the right response is to fit a hobble that same day, not to wait a week hoping it sorts itself out. Every day of delay lets the wrong position set and lowers the odds.
Field note: separate, warm and hydrate before you tape
Before fitting any hobble, we get the basics right: move the affected chick to a small, warm, non-slip pen where it will not be trampled, and make sure it can actually drink. A splayed chick that has been stuck on a cold floor for hours is often chilled and a little dehydrated, and a warm, hydrated chick copes far better with the hobble and pushes up sooner. A shallow lid of water it can reach without standing, or a few drops given carefully, plus steady warmth for an hour, makes the taping that follows more successful. Fix the chick and its environment together, not the leg in isolation.
How to fix it: the hobble, step by step
The standard, well-proven fix is a soft hobble (also called a brace or, informally, "chick sandals" when the toes are involved) that holds the two legs a natural distance apart so the chick's own muscles pull them back under the body. You do not need anything fancy. A short strip of vetwrap (self-adhesive bandage) is ideal; a fabric plaster/Band-Aid, soft yarn, or a thin rubber band cut and tied can also work. The method, drawn from hatchery and poultry-keeping guidance:
- Cut a short piece of vetwrap or bandage. Wrap a small piece gently around each leg just below the hock (knee) joint — snug enough to hold, never tight enough to cut off circulation.
- Join the two leg cuffs with a bridge of the same material so the legs are held slightly wider than a normal stance, with a little play so the chick can shuffle and push. The classic spacing keeps the feet where they would sit under a normally standing chick — not clamped together, not still splayed.
- Stand the chick on a non-slip surface — a paper towel or rubber shelf liner — so its feet can grip and it can practise pushing up.
- Check daily. Remove or loosen the brace once a day to check the legs, look for rubbing or swelling, and re-adjust as the chick strengthens.
Most chicks respond quickly. General guidance is that a braced chick can learn to push up, stand and walk correctly within less than a week — often within two or three days — and where curled toes are also taped flat, the toes often straighten after a day or two. Keep the hobble on until the chick stands and walks confidently on its own, then remove it. If after several days there is no improvement at all, or the leg is clearly deformed or painful, the cause may be more than simple splaying and a knowledgeable vet or extension officer should look at it.
| Element | Do | Avoid |
|---|---|---|
| Brooder / hatch floor | Paper towel, rubber shelf liner, textured mat | Bare newspaper, glossy plastic, smooth cement |
| Hobble material | Vetwrap, fabric plaster, soft yarn | Anything tight, sharp or non-removable |
| Leg spacing | Natural stance width, slight play to move | Legs clamped together or left splayed |
| Timing | Fit the same day you spot it | "Wait and see" for days |
| Monitoring | Check and re-adjust once daily | Leave taped and forget |
Prevention: a grippy floor and a steady brooder
Spraddle leg is one of those problems where prevention is almost free and far easier than the cure. The single biggest measure is flooring the chick can grip. From the moment chicks hatch or arrive, stand them on paper towel, rubber shelf liner, or a textured rubber mat — never bare newspaper, glossy plastic or smooth cement, which are the surfaces poultryDVM specifically blames. For the first days of brooding, a grippy floor does more to prevent leg problems than almost anything else. Alongside that:
- Correct, steady brooder warmth. Chicks that are the right temperature stay active and upright; chilled chicks sit and pile, which strains splayed legs. Getting brooder temperature right from day one is core prevention — see our brooder temperature chart. Avoid cold nights and draughts.
- Good incubation. If you hatch your own eggs, hold incubation temperature and humidity steady, because swings in the last days produce weak-legged chicks. Consistency matters more than chasing a perfect single reading.
- Feed the breeders properly. Chicks are only as strong as the egg they came from. Breeding birds need a proper breeder ration with adequate vitamins, not just a layer feed — under-nourished breeders produce leg-weak chicks. Our guide to making poultry feed covers getting the vitamin and mineral side right.
- Choose strong chicks. If you buy in, start with lively, well-legged chicks from a good hatchery; how to judge them is in our guide to choosing healthy day-old chicks.
Field note: the cheapest prevention is what you put on the floor
If we had to give one piece of advice to stop spraddle leg, it would be this: never brood day-old chicks on bare newspaper or a smooth surface. A roll of paper towel over the litter, or a piece of rubber shelf/drawer liner, gives tiny feet the grip they need and costs almost nothing. We treat the first three or four days as the critical window — that is when soft legs either learn to stand square or slide apart. Get the floor grippy and the brooder warm for those few days, and the number of splayed chicks you ever have to tape drops close to zero.
The economics and the honest limits
Spraddle leg is not a flock-wide killer like Newcastle or coccidiosis — it usually affects the odd chick, or a handful in a batch. But each one you save is a bird raised, and each one you lose is a wasted chick and a sign that your floor, brooder or chick source needs attention. The economics are simple: a hobble costs a scrap of bandage and a few minutes, and prevention costs the price of paper towel — an easy trade against a chick that would otherwise starve. Be honest about the limits, though: the fix works best on young chicks caught early, while a chick that has been splayed for a week or more may have set in the wrong position, and truly deformed legs sometimes do not come right no matter how carefully you tape. That is not a reason to give up on a fresh case — most young ones respond — but it is a reason to act on the day you see it, and to fix the underlying floor and warmth so you are not taping chick after chick.
The bottom line on spraddle leg
Spraddle leg looks like a disaster and is usually one of the most fixable problems you will meet in day-old chicks. It is a mechanical problem — weak legs on a slippery floor, often with a nudge from poor incubation, chilling or thin breeder nutrition — and the answer matches the cause: hold the legs a natural width apart with a soft hobble, stand the chick on a surface it can grip, keep it warm and able to drink, and check it daily. Most young chicks are standing within two or three days. Better still, stop it before it starts: brood on paper towel or rubber liner rather than bare newspaper, keep the brooder steadily warm, incubate consistently, and feed your breeders a proper ration. Do that and spraddle leg becomes a rare, quickly-mended nuisance rather than a recurring loss.
Frequently asked questions
What causes spraddle leg in chicks?
How do I fix spraddle leg at home?
How long does it take to correct spraddle leg?
Will a chick with spraddle leg recover fully?
What surface should I brood chicks on to prevent it?
Is spraddle leg the same as curled toes?
Can I prevent spraddle leg with the incubator or breeder feed?
What happens if I don't treat a spraddle-leg chick?
Sources & further reading
- poultryDVM — Splay Leg in Chickens: Signs, Treatment & Prevention (causes including slippery flooring, incubation faults and breeder nutrition; hobbling and non-slip surfaces; early treatment).
- The Chicken Chick — Spraddle Leg & Crooked Toes in Chicks (hobble construction, leg spacing, correction within days, daily monitoring, non-slip brooder surface).
- Agro Prime Ghana guides: brooder temperature chart, choosing healthy day-old chicks, and how to make poultry feed.
About Agro Prime Ghana
Agro Prime Ghana Limited runs a poultry hatchery and mixed agribusiness in Kasoa, supplying day-old chicks and supporting poultry keepers nationwide. These guides combine hands-on hatchery and brooding experience with current veterinary references. This article is general educational information, not a substitute for professional veterinary advice — if a chick's leg problem does not respond or looks deformed or painful, have it seen. Need chicks, feed advice or farm support? Book a visit or message us on WhatsApp (+233 24 915 1503).