Setting eggs means loading your hatching eggs into the incubator to begin the 21-day journey to hatch — and how you do it in the first hour decides a surprising amount of your final hatch rate. The core recipe for chicken eggs is straightforward: let cool eggs warm gently to room temperature first, place them large end up (or on their sides with the large end slightly raised), then hold a steady 37.5°C (about 99.5°F) and roughly 55–60% relative humidity from setting through day 18, turning them several times a day. Get those set points stable and consistent and you give every fertile egg its best chance; rush the eggs in cold, point them the wrong way, or let temperature and humidity swing, and you lose birds before they ever form. This guide covers pre-warming, positioning, marking your set, and stabilising the machine under Ghanaian conditions so your incubator does its job.
Written by the Agro Prime Ghana hatchery team and reviewed against current incubation references (Mississippi State University Extension). Last updated September 2026.
Key takeaways
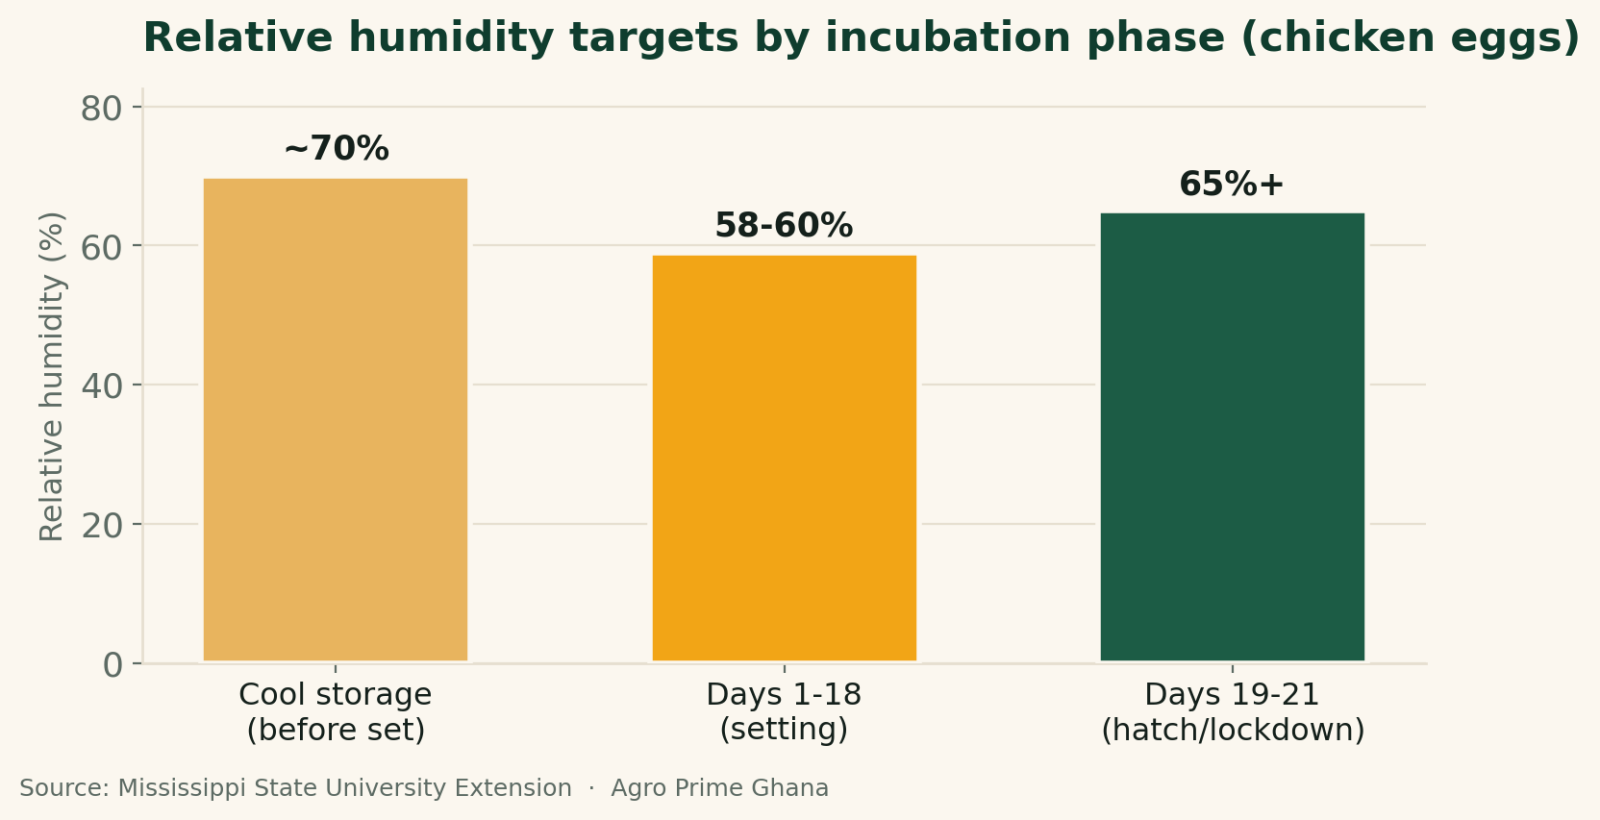
Before setting, let cool eggs warm slowly to room temperature — never move them straight from a cool store into a hot incubator, or condensation ("sweating") on the shell can push bacteria in and reduce the hatch. Set eggs large end up or horizontally with the large end slightly elevated, never small end up, so the air cell and the chick sit correctly. Run a forced-air incubator at about 37.5–37.8°C (99.5–100°F) and 58–60% relative humidity (roughly 84–86°F wet-bulb) from setting to day 18, then raise humidity to 65% or more for the day 19–21 hatch. Turn eggs at least 4–6 times a day until day 18. Stabilise the empty machine for 24 hours before setting, mark each egg with an X and O, and record your set date so you know when to candle, stop turning and expect the hatch.
What does "setting eggs" mean, and why do the first hours matter?
Setting eggs is the act of placing your hatching eggs into a running, stabilised incubator to start development — day zero of the roughly 21-day incubation of a chicken egg. It sounds simple, but the way eggs are prepared and loaded in those first hours has a lasting effect, because the embryo is a single tiny cell that has been paused in cool storage and is now being told to grow. A gentle, correct start lets every fertile egg begin cleanly; a harsh one kills or weakens embryos before you would ever see a problem on candling. Three decisions dominate the setting process: the temperature of the eggs going in (pre-warming), which way up they sit (positioning), and how stable the machine is when you load it. Get those three right and the rest of incubation is mostly steady management. This is why experienced hatchery operators treat setting not as "just putting eggs in" but as a deliberate, checklist-driven step.
Why should you pre-warm eggs before setting them?
Pre-warming means letting cool hatching eggs rise gently to room temperature before they go into the incubator, and it is the step most home keepers skip. Hatching eggs are best stored cool — Mississippi State University Extension recommends storing at around 50–65°F (about 13–18°C) with the small end down — but moving a cold egg straight into a 37.5°C machine is a mistake. As MSU warns, abruptly warming an egg from storage temperature to incubation temperature causes moisture to condense on the shell ("sweating"), and that film of water can carry bacteria through the shell's pores, leading to infection and reduced hatches. The fix is simple: bring the eggs out of the cool store and let them sit in the room, large end up, for several hours (often overnight) until they reach ambient temperature, then set them. In Ghana's warm rooms this happens fairly quickly, but it should never be rushed by putting cold eggs into a hot machine. Pre-warming also helps development start more evenly across the whole batch, which tightens your hatch window. If you have been storing eggs for a while first, our guide to storing hatching eggs before setting covers how long you can hold them before hatchability falls.
| Incubation phase (chicken eggs) | Temperature (forced-air) | Relative humidity | Turning |
|---|---|---|---|
| Cool storage before setting | ~50–65°F (13–18°C) | ~70% (store), small end down | Tilt/reposition daily if held >5–7 days |
| Setting to day 18 (development) | ~99.5–100°F (37.5–37.8°C) | 58–60% (84–86°F wet-bulb) | At least 4–6 times daily |
| Days 19–21 (lockdown & hatch) | ~99–99.5°F (37.2–37.5°C) | 65% or more | Stop turning; do not open |
Which way up do you set eggs? Large end up, always
Set chicken eggs with the large (blunt) end up, or lying horizontally with the large end slightly elevated — never with the small end pointing up. Mississippi State University Extension is explicit: eggs are "initially set in the incubator with the large end up or horizontally with the large end slightly elevated," and you should never position eggs small end upward. The reason is anatomy. The air cell sits at the large end, and the developing chick orients itself so that, near hatching, its head ends up in the air cell at the big end, where it takes its first breath and pips out. Set an egg upside down and you fight that natural orientation, raising the risk of the chick positioning wrongly ("malposition"), failing to reach the air cell, and dying in the shell after pipping. In an automatic turner with egg cups, this means placing eggs pointed end down into the cups. If you incubate eggs on their sides in a tabletop machine, keep the large end very slightly higher and make sure the turning mechanism or your hand-turning keeps them moving. Correct positioning costs nothing and quietly prevents a category of late, heartbreaking losses.
What temperature and humidity should the incubator hold?
For chicken eggs in a forced-air incubator (one with a fan), hold the temperature close to 37.5–37.8°C, which is 99.5–100°F, throughout the development phase. Mississippi State University Extension advises keeping forced-air machines at 100°F for the whole incubation period, and notes that total variation should not exceed one degree, with minor fluctuations under half a degree acceptable. Still-air incubators (no fan) are run hotter at the top of the eggs, around 102°F, because heat layers unevenly without a fan. Temperature is the master control: run consistently too hot and chicks hatch early, small and weak; too cool and they hatch late or not at all.
Humidity matters almost as much. From setting through day 18, MSU recommends a relative humidity of 58–60% (about 84–86°F wet-bulb), provided by a water pan with a surface area of roughly half the incubator floor or more. Then for the day 19–21 hatch, humidity is raised to 65% or more to keep the inner membrane from drying and shrink-wrapping the chick as it pips. The right day-1-to-18 humidity is the level that lets each egg lose about 12% of its weight across incubation — which you can check by watching the air cell grow when you candle. Because Ghana's ambient humidity swings between the harmattan dry season and the rains, you will need to adjust water surface and ventilation seasonally rather than trusting one fixed setting. Our fuller incubator temperature and humidity guide works through the seasonal adjustments in detail.
Field note: stabilise the empty machine for a full day first
The mistake we see most often is setting eggs into a machine that was only switched on an hour earlier. Incubators need time to settle — the thermostat overshoots, the humidity drifts, and the reading on the display is not yet the real, steady temperature at egg level. On our floor we run every incubator empty for at least 24 hours before setting, with the water pans filled, and we watch that it holds a steady temperature and humidity through a full day-and-night cycle, including the cooler small hours. We also cross-check the built-in display against a separate, trusted thermometer placed at egg height, because a machine reading "37.5" on its screen can be a degree off where the eggs actually sit. Only when it holds rock-steady do the eggs go in.
How to load and mark your set
Once the machine is stable and the eggs are pre-warmed, loading is quick but worth doing tidily. Place eggs large end up (or as described above), spacing them so air can move around each one, and do not overload the trays. If you are hand-turning in a tabletop machine, mark each egg with an "X" on one side and an "O" on the other using a soft pencil, as MSU recommends — this lets you see at a glance that every egg has actually been turned, with all the X's up after one turn and all the O's up after the next. Write the set date on the eggs or a card, and note the key downstream dates immediately: candling around days 7, 14 and 18; stop turning at day 18; and expected hatch at day 21. Good hatchery records — set date, egg source, machine, candling results, hatch count — turn each batch into information you can learn from, which is why we treat hatchery record-keeping as part of setting, not an afterthought. Once loaded, resist the urge to keep opening the machine; every opening drops temperature and humidity and slows the settle-back.
Skip the incubator headaches — order strong day-old chicks from our hatchery
Incubation rewards precision, and not every farmer wants to run a machine — especially when a poor set can cost you weeks. Agro Prime Ghana runs a hatchery in Kasoa and supplies healthy, vaccinated day-old chicks (broilers and layers) ready to brood, so you can skip the incubation risk entirely and start with strong chicks. And if you do want to incubate your own, we are glad to help you dial in temperature, humidity, turning and setting for your machine, and to advise on sourcing good hatching eggs. Message us on WhatsApp at +233 24 915 1503 or book a visit to order chicks, buy hatching eggs, or get hands-on incubation advice.
Field note: do not wash hatching eggs before setting
A clean-looking egg tempts people to scrub off any dirt before setting, but washing hatching eggs usually does more harm than good. The shell has a natural protective layer (the cuticle), and washing — especially in cool water — can strip it and actually draw bacteria in through the pores, raising the risk of rotten, exploding eggs mid-incubation. We set only clean, sound eggs and simply reject badly soiled or cracked ones rather than washing them into the machine. If an egg is lightly marked, dry-brushing is gentler than water. Start clean at collection, and you avoid the whole problem.
Ventilation and the small daily checks after setting
Developing embryos breathe — they take in oxygen and give off carbon dioxide through the shell — so the incubator must supply fresh air, and that need grows as the embryos do. Mississippi State University Extension advises that air vents should be gradually opened as the embryos develop, and almost fully open during the later stages of hatching, because a batch of hatching chicks demands a lot of oxygen. The balance to strike is fresh air without losing so much heat and humidity that your set points drift. After setting, your daily routine is light but important: confirm the temperature and humidity are holding, top up the water pan as needed, make sure turning is happening (either the automatic turner is running or you are hand-turning several times a day), and glance for anything abnormal. Then leave the machine closed as much as possible. Good incubator ventilation and airflow is easy to forget because you cannot see it, but stale, oxygen-poor air quietly weakens embryos, especially late in incubation.
The bottom line on setting eggs
Setting eggs well is about a calm, correct start. Warm cool eggs gently to room temperature so they do not sweat and take in bacteria; set them large end up so the chick can orient toward the air cell and pip cleanly; stabilise the empty machine for a full day so it truly holds 37.5°C and 58–60% humidity before any egg goes in; then turn several times a day, ventilate as the embryos grow, and raise humidity to 65% or more for the day-19 lockdown. Mark your eggs, record your set date, and plan your candling and hatch dates from the start. None of these steps is hard or costly, but together they decide how many of your fertile eggs become strong, live chicks. Set with care and the incubator becomes a reliable tool rather than a gamble.
Frequently asked questions
What temperature and humidity should I set eggs at?
Should I warm eggs before putting them in the incubator?
Which way up do you put eggs in an incubator?
How long should I run the incubator before setting eggs?
How often do I turn eggs after setting?
How long does it take chicken eggs to hatch?
Why is my incubator humidity hard to control in Ghana?
Do I need to open the vents on the incubator?
Sources & further reading
- Mississippi State University Extension — Important Incubation Factors (temperature 100°F forced-air, humidity 58–60% then 65%, positioning large end up, pre-warming, turning, ventilation).
- Mississippi State University Extension — Hatching Egg Storage Period (storage temperature and duration before setting).
- Agro Prime Ghana guides: egg candling guide, turning eggs during incubation, and incubator temperature and humidity guide.
About Agro Prime Ghana
Agro Prime Ghana Limited runs a poultry hatchery and mixed agribusiness in Kasoa, supplying day-old chicks and supporting poultry keepers nationwide. These guides combine hands-on hatchery experience with current incubation references. This article is general educational information, not a substitute for advice tailored to your own machine and eggs. Ready to start incubating, fix a poor hatch, or skip the machine and buy strong day-old chicks? Book a visit or message us on WhatsApp (+233 24 915 1503) for chicks, hatching eggs or incubation support.