The essential brooder kit for a Ghanaian poultry keeper is a reliable heat source, a draught-proof brooder guard, enough feeders and drinkers for every chick to reach at once, dry litter, and a thermometer to prove the temperature rather than guess it. Get those five things right in the first two weeks and you have solved most of what kills day-old chicks. A brooder is simply an artificial mother hen: for the first three weeks a chick cannot regulate its own body heat, so your equipment has to hold a warm, dry, calm micro-climate around the clock. Most first-week deaths on small farms are not exotic diseases at all — they are chilling, piling, empty crops and dirty water, all of which come down to the wrong equipment or the wrong setup. This guide walks through every piece of brooder equipment you need in Ghana, how to size it, and how to choose safely between gas, electric and charcoal heat.
Written by the Agro Prime Ghana hatchery team and reviewed against current industry and extension references (Penn State Extension and the MSD Veterinary Manual). Last updated September 2026.
Key takeaways
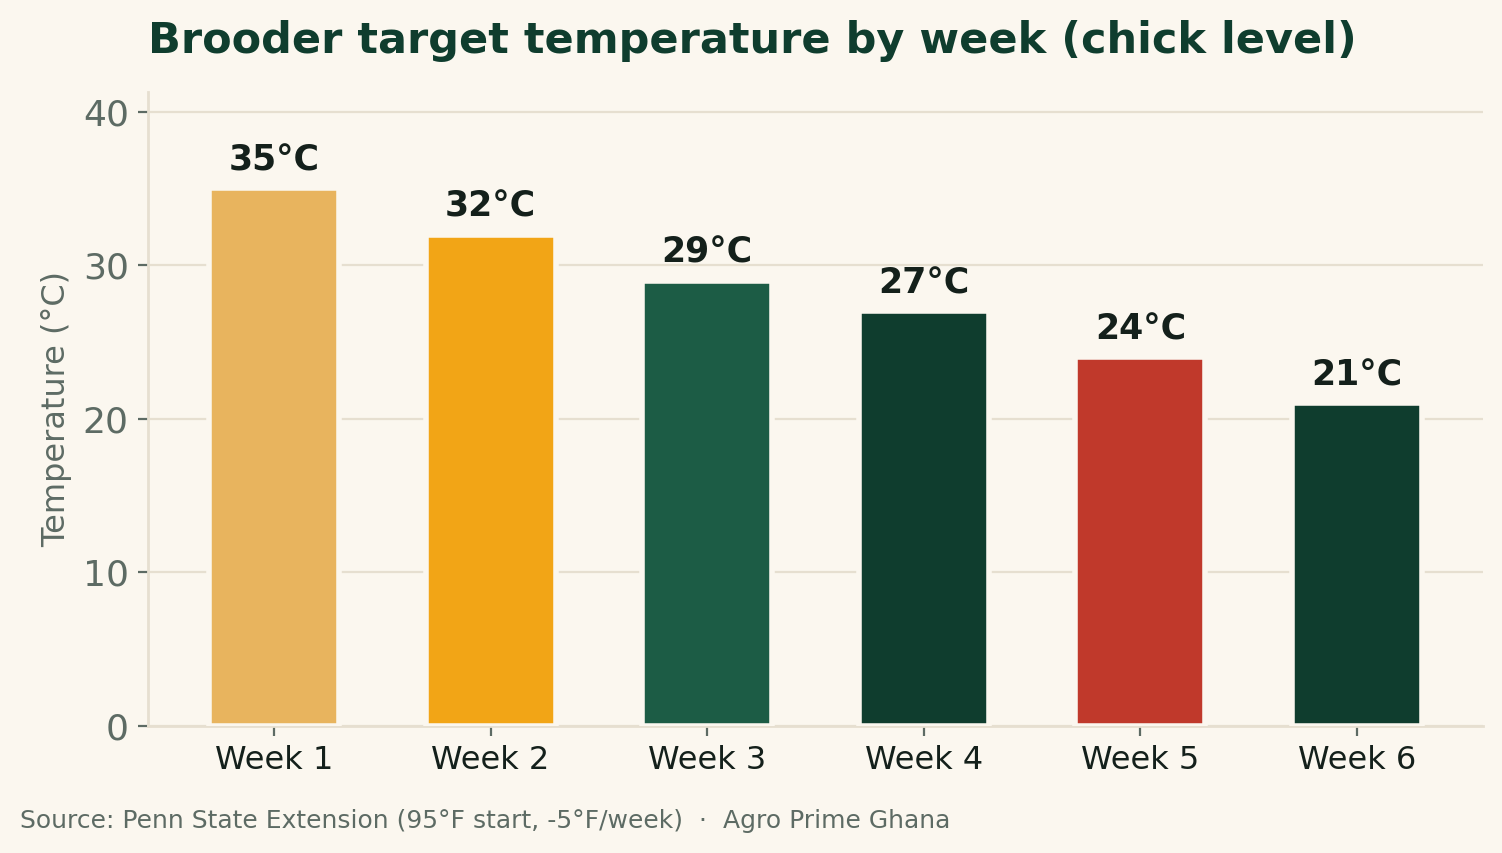
A chick's brooder should start at about 35 °C (95 °F) at chick level under the heat source in week one, then drop roughly 2.5–3 °C (5 °F) each week until birds are comfortable at house temperature. You need one heat source sized to your flock, a circular brooder guard to stop piling and draughts, feeders giving about 1 inch (2.5 cm) of space per chick, drinkers giving roughly one 4-litre fount per 25 chicks, 5–8 cm of dry litter, and a thermometer at chick height. Keep any heat lamp at least 50 cm (20 inches) from flammable material. Read the birds, not just the gauge: chicks spread evenly are comfortable, huddled under the heat are cold, pushed to the walls and panting are too hot. Gas and electric brooders are safest; charcoal works but demands ventilation to avoid deadly carbon monoxide and fire.
What a brooder is and why the equipment matters
A brooder is the heated, enclosed area where day-old chicks live for roughly their first three weeks, and the equipment in it does the job the hen would otherwise do — supplying warmth, keeping the chicks together and safe, and putting feed and water within easy reach. For about the first two to three weeks a chick's own temperature-regulating system is not yet working, so it depends entirely on external heat; get too cold and it stops eating, huddles, piles on its penmates and dies of chilling, while too hot and it dehydrates and pants. Penn State Extension sets the target at 95 °F (35 °C) at chick level under the heat source for the first week, then reducing the heat by about 5 °F (roughly 2.5–3 °C) per week until the flock is comfortable at normal house temperature. Because these tolerances are narrow and the chick is fragile, the equipment is not a luxury — each piece exists to hold that micro-climate steady. This is also why our brooder temperature chart matters more than any single gadget: the kit is only there to hit and hold those numbers.
Why brooder equipment is decisive under Ghanaian conditions
In Ghana the brooder has to cope with two opposite problems, sometimes in the same week, and the right equipment is what lets it. In the hot, humid south around Kasoa and Accra, the danger is often overheating and stale, damp air, so your guard, ventilation and thermometer stop you cooking the chicks; during the harmattan from about November to February, cold, dry nights can send house temperatures tumbling, and a chick that was fine at noon can chill badly by 3 a.m. if the heat source cannot keep up. Power is the other reality: grid outages (“dumsor”) will cut an electric brooder at exactly the wrong moment, which is why a backup plan is part of the equipment list, not an afterthought — see our guide to backup power for poultry farms. Good kit also protects your investment directly: healthy, well-brooded chicks reach their genetic potential, while a bad first week leaves a permanently uneven, stunted flock no feed can fix later. In short, the brooder equipment is the cheapest insurance you will ever buy on a batch of chicks.
Heat sources compared: gas vs electric vs charcoal
The single most important piece of brooder equipment is the heat source, and in Ghana you are realistically choosing between gas brooders, electric heat lamps, and charcoal pots (coal pots or “improvised” brooders). Each can hit the target temperature; they differ in running cost, reliability during outages, and — crucially — safety. The table below compares them on the things that actually matter on a Ghanaian farm.
| Heat source | Strengths | Watch-outs & safety | Best for |
|---|---|---|---|
| Gas brooder (LPG) | Strong, even heat; works through power cuts; easy to adjust; good for larger batches | Cylinder cost and refills; needs correct regulator and no leaks; still needs ventilation | Commercial batches; farms with unreliable power |
| Electric (infrared heat lamp / bulb) | Cheap to buy; clean; precise; simple for small flocks | Fails instantly in a power cut; bulbs are a fire risk if they touch litter or fall; keep ≥50 cm (20 in) from anything flammable | Small flocks with steady power or a generator |
| Charcoal / coal pot | Very low cost; independent of grid; widely available | Carbon monoxide and fire are real risks; needs constant tending, ventilation and a safe stand; uneven heat; smoke irritates airways | Very small or start-up flocks with careful supervision |
Penn State Extension is explicit that a heat lamp must sit at least 20 inches (about 50 cm) from any flammable material — a rule worth painting on the wall, because litter fires from fallen or low-hung bulbs destroy houses and flocks every year. Whatever source you pick, the principle is the same: heat the chicks, not the whole house, and always give yourself a way to keep heat on when the grid fails.
The brooder guard: your most underrated piece of kit
A brooder guard is a low, circular fence — usually cardboard, plywood, or plastic sheet about 45–60 cm high — set around the heat source, and it does more than most keepers realise. Its first job is to stop piling: chicks instinctively bunch in corners when cold or startled, and in a square pen the ones at the bottom of the pile suffocate. A circle has no corners, so it removes the death-trap. Its second job is to keep the chicks within reach of heat, feed and water during those first days when they wander poorly, and its third is to block floor-level draughts, which chill chicks fast. Start the circle fairly tight around the heat source and enlarge it every few days as the birds grow, removing it altogether by about the end of week two. We cover the practical setup in detail in our brooder guard setup guide — it is genuinely one of the cheapest, highest-impact things in the whole brooder.
Field note: let the chicks tell you the temperature
On our hatchery floor the thermometer is a starting point, not the final word — the chicks are the real gauge, and reading them takes five seconds from the door. Chicks spread out evenly, chirping softly, moving freely between feed, water and warmth are comfortable. Chicks huddled in a tight ball under the heat, chirping loudly and shrilly, are cold — drop the guard tighter, add heat, or block a draught. Chicks pushed right out to the walls of the guard, wings held out, beaks open and panting, are too hot — raise or reduce the heat. And chicks all banked to one side are telling you a draught is coming from the opposite direction. We do this “chick read” every time we pass the house, day and night, because a gauge on the wall never feels the draught at floor level where the birds actually live.
Feeders and drinkers: enough space for every chick at once
Undersized or badly placed feeders and drinkers quietly starve a flock even when the store is full of feed, because the weakest chicks simply cannot get to the trough. The rule is that every chick should be able to eat and drink at the same time in the early days. Penn State Extension suggests about 1 inch (2.5 cm) of feeder space per chick in week one, rising toward 3 inches by week eight, and roughly half an inch of drinker space per chick early on, with about one quart (roughly one litre) of water available for every 25 chicks — in practice, one 4-litre fount comfortably serves around 25 chicks in the first days. Start with shallow chick founts and flat feeder trays or box lids so tiny birds can reach, then graduate to tube feeders and larger drinkers. Space them evenly around the guard so no chick is ever more than a short walk from feed and water, and raise their lips to back height as birds grow to keep litter and droppings out. Our feeders and drinkers guide works through sizing for each stage.
Litter, thermometer and the small equipment that finishes the job
Two more items separate a good brooder from a risky one. The first is litter: a dry, absorbent bedding — typically clean wood shavings — laid about 5–8 cm (2–3 inches) deep to cushion legs, absorb droppings and insulate the floor. For the very first days, cover slippery surfaces with paper or rough card and lay some feed on it so chicks learn to peck; keep the litter dry, because damp litter chills chicks, breeds coccidiosis and drives up ammonia. Avoid fine sawdust for tiny chicks, which may eat it. The second item is a plain thermometer placed at chick height, not up near the roof — the temperature that matters is the one two centimetres above the litter where the birds stand. A simple wall or probe thermometer costs little and turns brooding from guesswork into management; pair it with a hygrometer if you can, since very dry harmattan air and very damp wet-season air both need watching. Round out the kit with a brooder guard, clean buckets, a scoop, and — for anyone on the grid — a generator, gas backup or spare lamp so a power cut is an inconvenience, not a disaster.
Start with chicks that are worth brooding
The best brooder equipment in Ghana cannot rescue weak, poorly hatched or unvaccinated chicks — brooding only preserves the quality the chick arrives with. Agro Prime Ghana supplies strong, uniform day-old broiler and layer chicks from a managed hatchery, vaccinated to schedule, so your kit is protecting birds that can actually perform. If you are setting up a brooder for the first time and want a straight answer on how many chicks your space and heat source can handle — or a simple brooding and vaccination plan to follow — message us on WhatsApp (+233 24 915 1503) or book a visit to the farm in Kasoa. We would rather help you set the brooder up right than sell you chicks that struggle in a cold pen.
How to set the brooder up before the chicks arrive
Good brooding starts before the chicks land. Clean and disinfect the house and equipment and let it dry; lay fresh, dry litter and cover the first-day area with paper; assemble the guard in a circle around the heat source; place feeders and drinkers evenly inside it; then pre-heat the brooder for at least 24 hours so the litter and floor — not just the air — are warm to 35 °C at chick level on arrival. Cold floors chill chicks from below even when the air reads correctly, so this pre-heat is not optional. Fill drinkers with clean, slightly warm water so it is not cold, and add feed to trays. When the chicks come, dip a few beaks in the water to teach drinking, then leave them to settle and do your first “chick read” within the hour. Our full routine is in how to brood day-old chicks and the critical window in the first 48 hours after arrival.
Field note: plan for the power to go off
The mistake we see most with electric brooders is treating the grid as reliable. It is not — and chicks chill fastest in the small hours when nobody is watching. Our habit is simple: never run a brooder on a single point of failure. If your primary heat is electric, keep a filled gas cylinder and a spare burner, or a small generator fuelled and ready, close to the house. Do a “blackout drill” before the chicks arrive so you can switch heat sources in a couple of minutes in the dark. A batch of chicks represents real money; a spare heat source that stops one cold night from becoming a wipe-out is the cheapest insurance on the farm.
Common brooder equipment mistakes to avoid
Most brooder failures repeat the same handful of equipment errors. Measuring temperature at the wrong height, up near the roof rather than at chick level, leaves birds cold while the gauge reads fine. Square pens with corners invite fatal piling — use a circular guard. Too few feeders or drinkers starve the weakest chicks. Heat lamps hung too low or over litter risk fire; keep them at least 50 cm from flammable material and secured so they cannot fall. Damp litter from leaking drinkers chills chicks and breeds disease. Trusting a single power source leaves you helpless in an outage. And ignoring the chicks' own behaviour — the huddling, panting or banking that tells you the truth — wastes the best diagnostic you have. Fix these and the equipment does its job.
The bottom line on brooder equipment in Ghana
Brooding equipment is not about owning the fanciest kit; it is about assembling a handful of reliable pieces that together hold a warm, dry, calm environment for three weeks. Start at about 35 °C at chick level and step down roughly 5 °F a week; use a heat source you can keep running through a power cut; ring the birds with a circular guard; give every chick space at feed and water; lay dry litter; and hang a thermometer at chick height while trusting the chicks' behaviour above all. Choose heat sources with safety in mind — gas and electric over charcoal where you can, and never a heat lamp near litter. Do this consistently and the brooder stops being the riskiest fortnight of the batch and becomes the foundation of a strong, even flock.
Frequently asked questions
What temperature should a chick brooder be in the first week?
What equipment do I need to brood day-old chicks in Ghana?
Which is better for brooding: gas, electric or charcoal?
How many chicks does one drinker or feeder serve?
What is a brooder guard and do I really need one?
How deep should brooder litter be and what should I use?
How do I keep chicks warm during a power cut or harmattan?
Why do I need a thermometer if I can watch the chicks?
Sources & further reading
- Penn State Extension — Brooding of Domestic Fowl (starting temperature, weekly reduction, floor, feeder and drinker space, heat-lamp safety distance, signs of chilling and overheating).
- MSD Veterinary Manual — Management of Growing Chickens (brooding and rearing management principles).
- Agro Prime Ghana guides: brooder temperature chart, brooder guard setup, how to brood day-old chicks and backup power for poultry farms.
About Agro Prime Ghana
Agro Prime Ghana Limited runs a poultry hatchery and mixed agribusiness in Kasoa, supplying day-old chicks and working alongside poultry keepers across the country. These guides draw on that hands-on hatchery and farm experience, checked against current industry and veterinary references. This article is general educational information, not a substitute for professional veterinary or extension advice. We supply healthy day-old chicks (broilers & layers), point-of-lay pullets, quality feed and hands-on farm support across Ghana. Ready to start or expand? Book a visit or message us on WhatsApp (+233 24 915 1503) to order chicks, feed or advice.