The safest answer to "should I help this chick out of its shell?" is almost always wait. A chick that has made an external pip normally takes another 12 to 24 hours to zip round and free itself, and during that time it is doing essential, invisible work — absorbing the last of its yolk and drawing the blood back out of the shell membrane. Break the shell for it too early and you can tear those still-living blood vessels, cause it to bleed to death, or leave it with an unabsorbed yolk that kills it days later. Most struggling chicks should never be forced. This guide explains how to read the internal and external pip, the membrane and blood signs that tell you whether help is safe, the role humidity plays in chicks getting stuck, and the narrow, specific circumstances under which careful, patient assistance is justified.
Written by the Agro Prime Ghana hatchery team and reviewed against current incubation references (breed and hatchery guidance on pipping, yolk absorption and assisted hatching). Last updated September 2026.
Key takeaways
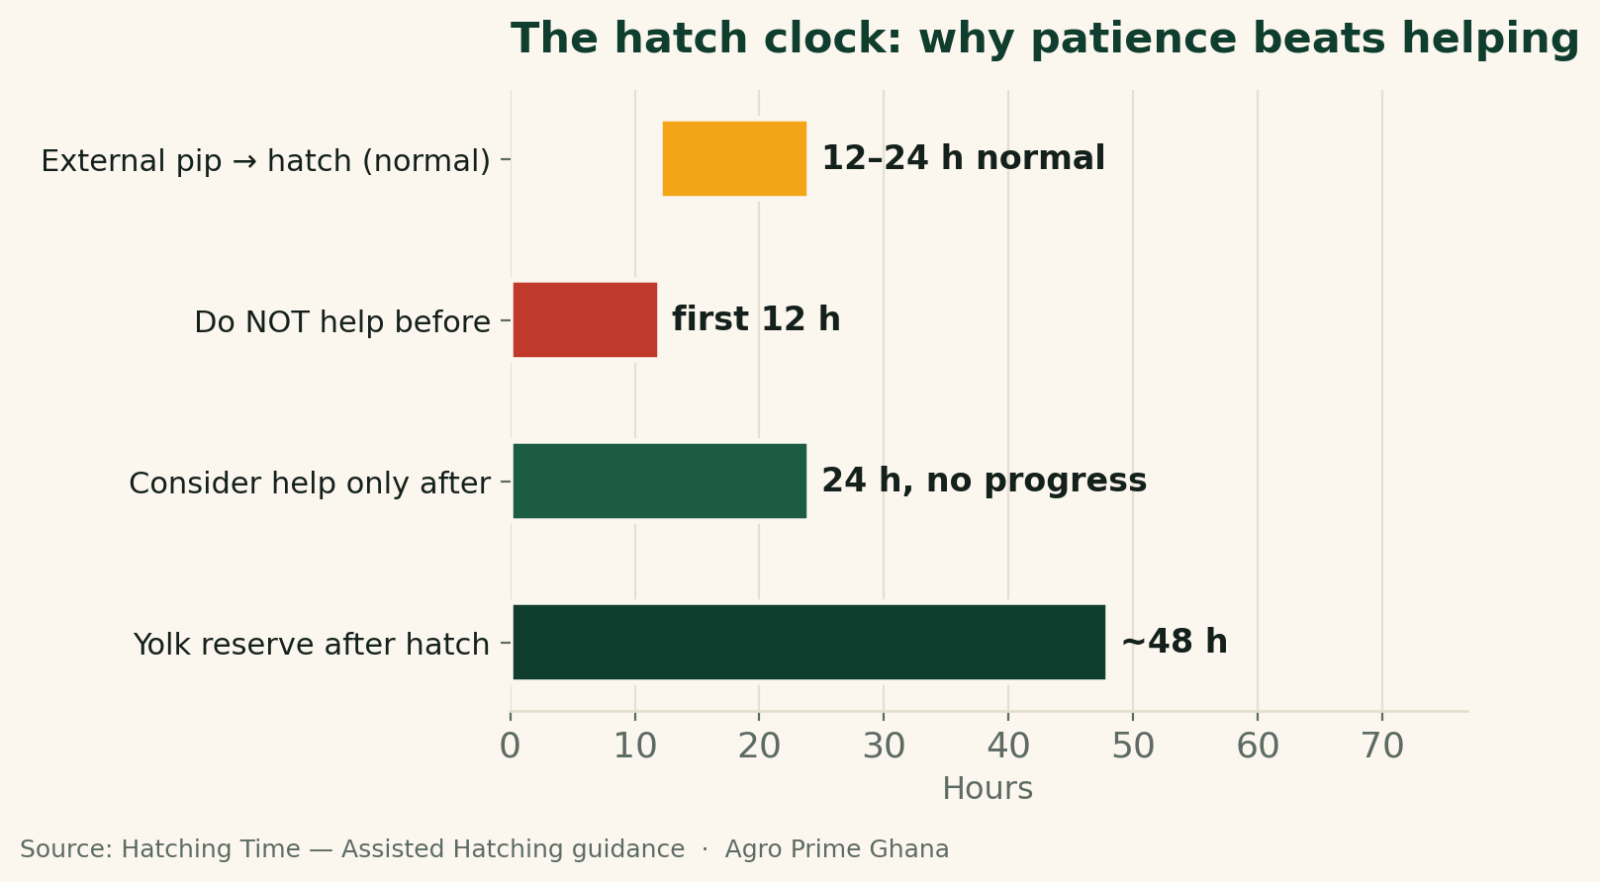
A chick hatches in stages: internal pip (it breaks into the air cell and starts breathing air, often with faint peeping), then external pip (the first visible hole in the shell), then zipping and hatch. From external pip to hatch normally takes 12–24 hours, and there is no rush. Do not intervene in the first 12 hours after external pip; only consider help if it has been over 24 hours with no progress, or other chicks hatched and one is clearly stuck. The danger signs that say stop: fresh blood when you peel membrane (live vessels), or an unabsorbed yolk. A safe-to-help membrane is dry, white and its blood vessels have receded. After hatch a chick can live about 48 hours on its absorbed yolk. Most "struggling" chicks are simply resting and should be left alone.
What actually happens when a chick hatches?
A chick does not simply crack its shell and walk out; it runs a carefully timed programme over the last two to three days, and understanding that programme is the whole basis for deciding whether to help. Up to about day 19 in a chicken egg the embryo is fully formed but still living off the yolk and breathing through the blood vessels of the membrane that lines the shell. Then it begins the hatch sequence. First comes the internal pip: the chick pushes its beak through the inner membrane into the air cell at the large end of the egg and takes its first breath of air, which is often when you first hear faint peeping or tapping from inside an intact shell. Over the next several hours to a day it does the most important work of its life — it draws the remaining yolk sac up into its abdomen and lets the blood retreat out of the shell membrane back into its body.
Only after that does the chick make the external pip — the first visible chip or hole in the shell — and rest again. Then, when it is ready, it braces its feet, rotates inside the shell and "zips" a line of cracks around the wide end, finally pushing the cap off and struggling free. From that first external pip to the chick actually emerging typically takes 12 to 24 hours, and a great deal of that time the chick appears to be doing nothing at all. That apparent idleness is not distress — it is the yolk and blood being absorbed. A keeper who mistakes resting for struggling, and who "rescues" the chick during this window, interrupts the one process that most determines whether the chick lives.
Why is helping too early so dangerous?
Helping too early is dangerous because the two life-or-death processes of hatching — yolk absorption and blood withdrawal from the membrane — are still happening behind the shell, and you cannot see them from outside. The membrane that lines the inside of the shell is threaded with blood vessels that are still carrying the chick's blood right up until shortly before it hatches. If you peel or tear that membrane while those vessels are live, the chick bleeds, and a chick has very little blood to lose. The clearest rule in all of assisted hatching is this: if you see fresh blood, stop at once and put the egg back. Bleeding means the vessels have not yet receded and the chick is not ready — full stop.
The second danger is the yolk. In the last day before hatch the chick pulls its yolk sac up through the navel into its belly; that absorbed yolk is its food and water reserve for the first days of life, enough to sustain it for roughly 48 hours after hatching. Pull a chick out of the shell before the yolk is fully absorbed and you leave an exposed, unhealed yolk sac hanging at the navel — which either ruptures, or becomes the perfect entry point for infection, leading to the swollen, smelly navel and yolk-sac infection keepers know as omphalitis or navel ill. Such a chick may look fine at hatch and then die on day two or three. This is why so many "successful" early rescues quietly die a few days later: the harm was done at the moment of over-eager help, not visible until much later.
How do I read the internal and external pip?
Reading the pip correctly is what separates a justified assist from a fatal mistake, so learn the two markers. The internal pip is usually invisible from outside — the chick has broken into the air cell but not the shell — and your only clue may be faint peeping or a light tapping from a shell that still looks whole. This is emphatically not a moment to help; the chick has only just started breathing air and has hours of yolk and blood work still to do. Candling in a dark room can sometimes confirm it: you may see the beak's shadow up in the air cell.
The external pip is the first visible break in the shell — a small raised crack or a chip of shell lifted at the wide end. This is the milestone from which you start your clock, and the single most useful number to hold in your head is that a normal chick may sit at external pip for 12 to 24 hours before it zips, resting between bursts of effort. So an external-pipped egg that has "done nothing" for several hours is behaving exactly as it should. Only when you are well past that window — and only alongside other warning signs — does help even enter the conversation. Between internal pip and hatch, the golden discipline is patience: keep the incubator closed, keep the humidity up, and let the chick work.
| Stage | What you see / hear | Should you help? |
|---|---|---|
| Internal pip | Faint peeping/tapping from an intact shell; beak in air cell on candling | No. Chick has just started breathing; yolk & blood work still to do |
| External pip (0–12 h) | First small hole/crack in the shell; long quiet rests between efforts | No. This is normal — the chick is resting and absorbing |
| External pip (12–24 h) | Still pipped, little zipping progress; chick active and peeping | Watch. Often still normal; check humidity, do not rush |
| Stalled (>24 h) | No progress, others have hatched, chick may seem tired or shrink-wrapped | Assess carefully. Help only if membrane is dry/white with receded vessels and no fresh blood |
What role does humidity play in chicks getting stuck?
Humidity is the single biggest management reason that otherwise healthy chicks fail to hatch, and it cuts both ways. During the setting period the egg must lose a controlled amount of moisture — about 11–13% of its weight over the first 18 days — so that the air cell grows to the right size for the chick to internally pip into. If humidity was too high through incubation, the egg loses too little water, the chick is oversized and waterlogged, and it can drown at internal pip or be too weak to hatch. If humidity was too low, the chick may be small and dehydrated. Our guide on incubator temperature and humidity and the wider incubation troubleshooting note cover getting that balance right.
The more acute problem happens during hatch itself, and it is where the temptation to help is greatest: shrink-wrapping. Once a chick has externally pipped, the shell membrane is exposed to the machine's air. If the humidity in the hatcher drops — very common in Ghana when a keeper keeps opening the lid to check on progress, or during dry harmattan weather — that membrane dries out, tightens and shrinks around the chick like plastic wrap, gluing it in place so it cannot rotate to zip. A shrink-wrapped chick is genuinely stuck, but the cause is a management failure, and the cure is usually more humidity, not surgery: keep the hatcher closed, resist the urge to open it, and if you must intervene, re-moisten the membrane with warm water rather than tearing at a dry one. Every time you open a hatching machine to "check," you drop the humidity and risk shrink-wrapping the very chicks you are worried about.
Field note: the closed lid is the best help we give a hatching chick
The hardest discipline on hatch day is doing nothing. On our floor the rule is simple: once the first eggs pip, the hatcher stays shut. The peeping and the slow, stalling progress are agonising to watch, but every lid-lift dumps the humidity and dries membranes, and we have seen more chicks lost to anxious checking than to genuine hatching trouble. When we do decide a chick truly needs help — and it is rare — we treat it as a slow operation done over hours in a warm, humid spot, chipping a little of the wide-end shell, watching the membrane, and stopping the instant we see any pink vessel or a drop of blood. If in doubt, we wait another few hours. Patience hatches more chicks than tweezers ever will.
When is it actually safe to help — and how?
Careful assistance is justified only in a narrow set of circumstances, and even then it must be slow, patient and instantly reversible. Consider helping only if all of these are true: it has been more than 24 hours since the external pip with no zipping progress; other chicks from the same set have already hatched (so the timing is genuinely late, not just early); and the chick appears to be stuck rather than resting — often because of shrink-wrapping. Before touching anything, get your hands and tools clean, work in a warm room so the chick does not chill, and have warm (not hot) water ready to moisten membrane.
If you decide to proceed, the technique is to enlarge the existing pip hole a little at a time, chipping tiny pieces of shell only from the wide (air-cell) end, and to check the membrane constantly. A membrane that is safe to work with is dry, whitish and its blood vessels have receded to fine, flat, dried-up lines — that tells you the blood has withdrawn into the chick. The moment you see a pink, full blood vessel or any fresh blood, stop immediately, dampen the membrane, and return the egg to the incubator for several more hours; the chick is not ready. Never pull the chick out. Never peel large sheets of membrane. If at any point you find the yolk sac is not yet absorbed (a visible sac of yolk at the belly), stop and return the egg — that chick needs more time, not extraction. Done properly, real assistance means freeing the air-cell end of a genuinely shrink-wrapped chick and then letting it finish the job itself. If you cannot tell whether it is safe, the correct action is always to wait.
Why most struggling chicks should never be forced
Most chicks that look like they are struggling are not in trouble — they are resting, and the "struggle" is the normal, exhausting, stop-start work of hatching. Nature has front-loaded the risk onto the helper: leaving a healthy chick alone almost never harms it, while helping the wrong chick, or the right chick at the wrong moment, frequently kills it. There is also a harder truth that experienced hatchery operators accept. A proportion of chicks that cannot hatch on their own are struggling for a reason — a malposition, a weakness, an underlying problem — and a chick that would have died in the shell is not always a chick that will thrive once dragged out. Forcing every weak chick can mean rearing birds that are poor doers, or that die in the first days anyway. This is not a reason to be callous; it is a reason to be humble about how little the shell shows you, and to let the natural process do the sorting it is designed to do.
The far more productive response to a batch that hatches poorly is not more heroic rescues but better incubation. If you are regularly finding chicks stuck, shrink-wrapped, or dead after internal pip, the answer lies upstream — in your humidity profile, your ventilation, your egg storage and your breeder flock — not in your tweezers. Our notes on incubation troubleshooting, incubator ventilation and why eggs don't hatch are where a poor hatch is really fixed.
Skip the surgery — start with strong chicks from a working hatchery
If you are hatching your own eggs and losing chicks at the pip stage, the cause is usually incubation set-up, and we are happy to help you diagnose it. But if you simply need reliable numbers of healthy day-old chicks without the hatch-day stress, that is exactly what Agro Prime Ghana does: we hatch strong, vigorous broiler and layer chicks in Kasoa and supply them across the country, with brooding and troubleshooting support included. Tell us what you are rearing and how many you need — message us on WhatsApp (+233 24 915 1503) or book a visit, and read our guides to choosing healthy day-old chicks before your next batch.
The bottom line on assisted hatching
Assisting a hatch is one of the few areas of poultry keeping where doing nothing is usually the expert move. A chick that has externally pipped is normally 12 to 24 hours from freeing itself, and it spends most of that time resting while it absorbs its yolk and pulls the blood out of the shell membrane — the two processes that decide whether it lives. Intervene early and you risk fatal bleeding or an unabsorbed yolk that kills days later; the only signals that ever justify careful help are a genuinely stalled chick past 24 hours with a dry, white, blood-free membrane, usually shrink-wrapped by low humidity. Keep the hatcher closed, protect the humidity, read the membrane and the yolk before you touch a thing, and stop at the first drop of blood. Above all, fix a poor hatch upstream in your incubation, not at the shell — because patience, not rescue, is what hatches strong chicks.
Frequently asked questions
Should I help a chick hatch out of its egg?
How long does a chick take to hatch after it pips?
How do I know if it is safe to help a chick?
What is shrink-wrapping and how do I prevent it?
Why do chicks die a few days after I help them hatch?
Is it cruel to leave a struggling chick in its shell?
My whole batch hatched late and weak — what went wrong?
What is the difference between an internal pip and an external pip?
Sources & further reading
- Hatching Time — Assisted Hatching: When to Help a Chick Hatch (internal vs external pip, 12–24 hour timeline, the stop-at-blood rule, ~48-hour yolk reserve, shrink-wrapping).
- Mississippi State University Extension — Important Incubation Factors (hatching-period humidity, why the machine should stay closed during hatch).
- The Poultry Site — Optimal Weight Loss Profile During Incubation (11–13% egg weight loss and its link to air-cell size and hatch).
- Agro Prime Ghana guides: incubator temperature & humidity, incubation troubleshooting, omphalitis / navel ill.
About Agro Prime Ghana
Agro Prime Ghana Limited runs a poultry hatchery and mixed agribusiness in Kasoa, hatching and supplying day-old chicks and supporting poultry keepers nationwide. These guides combine hands-on hatchery experience with current incubation references. This article is general educational information, not a substitute for professional advice. We supply healthy day-old chicks (broilers & layers), point-of-lay pullets, quality feed and hands-on farm support across Ghana. Want strong chicks without the hatch-day stress? Book a visit or message us on WhatsApp (+233 24 915 1503) to order chicks, feed or advice.