The most expensive mistake in a between-flocks turnaround is the one that looks like a job well done: a keeper sprays disinfectant over a house that still has manure caked on the floor, dust on the rafters and a greasy film on the drinkers, then brings in day-old chicks the next morning and wonders why they struggle from week one. Disinfectant poured onto dirt barely works — organic matter soaks it up and kills its action before it can kill a single germ. Real cleaning and disinfection is a sequence, not a single spray, and the order matters as much as the chemical. This guide walks through cleaning and disinfecting a poultry house between flocks, step by step, in the order that actually breaks the disease chain — dry clean, wash, disinfect, dry, rest — with the reasons behind each step so you can do it right on a Ghanaian farm.
Written by the Agro Prime Ghana poultry team and reviewed against current industry references (Cobb Genetics and PoultryBiosecurity.org guidance). Last updated September 2026.
Key takeaways
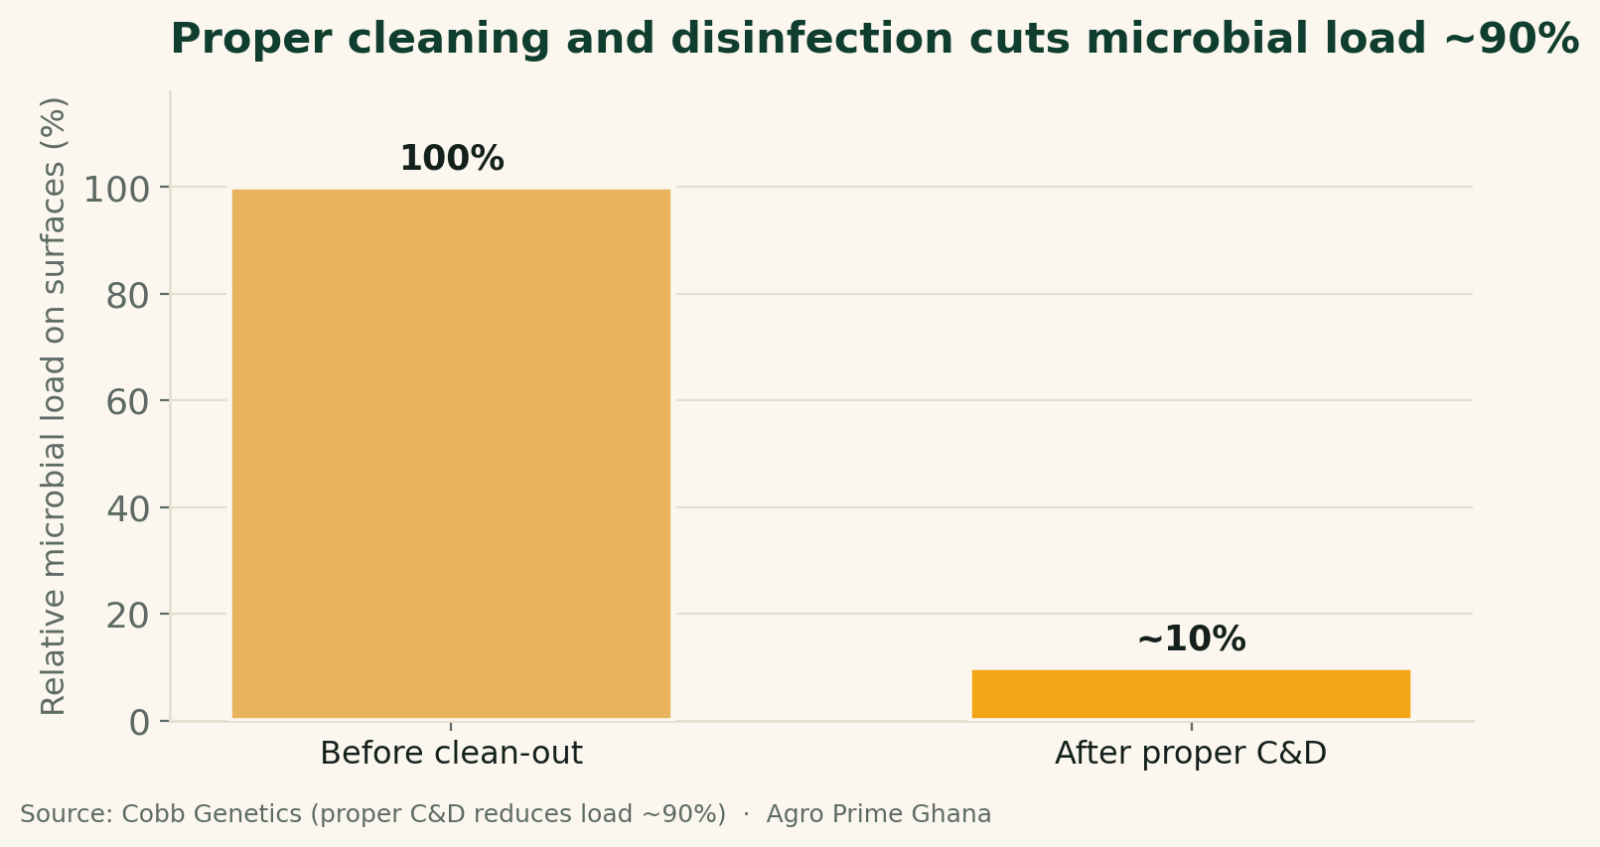
Cleaning and disinfection (C&D) between flocks follows a fixed order: dry clean, wash with detergent, dry, disinfect, then dry and rest. Skipping the cleaning and jumping straight to disinfectant wastes the chemical, because organic material — soil, litter, feed, manure — inactivates many disinfectants, especially chlorine and iodine types. Contact time is essential: germs are killed gradually, not instantly, so surfaces must stay wet with disinfectant for the full time on the label. Done properly, C&D reduces the microbial load on surfaces by about 90%. Finish with a proper dry-out and downtime — a controlled gap of up to about 14 days before the next flock — so birds arrive to a clean, dry house rather than a damp, freshly-sprayed one.
Why the order is everything
The single idea that separates effective C&D from wasted effort is this: you cannot disinfect dirt. Disinfectants are designed to kill germs on clean surfaces, and they are undone by the very muck a poultry house is full of. As the guidance from PoultryBiosecurity.org states plainly, "debris and organic material (e.g., soil, bedding, litter, feed, manure) can also inactivate many disinfectants (especially chlorine and iodine containing compounds)," and therefore "removal of all organic material prior to application of a disinfectant is essential." Manure and litter do two damaging things at once: they physically shield germs from the chemical, and they chemically neutralise the disinfectant so it never reaches full strength.
This is why the sequence is non-negotiable. Cleaning — the dry removal of debris followed by a proper detergent wash — is what makes the disinfection step actually work. A house that has been thoroughly cleaned but not yet disinfected is already far safer than one that has been sprayed with disinfectant over filth. The clean does most of the heavy lifting; the disinfectant finishes the job on a surface it can actually act on. Reverse the order, or skip the cleaning, and you have spent money on chemical for almost no benefit.
The five-step C&D sequence
PoultryBiosecurity.org sets out C&D as a five-step procedure, and it is worth learning as a fixed routine you repeat every turnaround. The steps are: (1) Dry clean — remove all gross contamination and organic material; (2) Wash and rinse — wash with a detergent solution to lift the remaining organic debris, inspect, and repeat if it is not clean; (3) Dry — where possible let surfaces dry completely before the disinfectant goes on; (4) Apply disinfectant — use an appropriate registered product, following the label for concentration and contact time; and (5) Rinse and dry — rinse thoroughly where the product requires it and allow everything to air-dry. Cobb Genetics adds a useful directional rule for the disinfection step: work "from the top to the sides and then the bottom of the house, and from the back to the front," so you are always moving from clean towards dirty and from done towards not-yet-done, never re-contaminating what you have finished.
Step by step on a Ghanaian farm
Here is how that sequence plays out in a real between-flocks turnaround, adapted to local houses and conditions:
- Clear the house completely. Remove all birds, then all movable equipment — feeders, drinkers, brooder guards, crates — for separate cleaning outside. A house being cleaned should be genuinely empty, which is only possible if you run single-age batches; see our guide to poultry biosecurity and all-in/all-out.
- Remove all litter and manure. Strip out every bit of used litter and cake and dispose of it well away from the houses, upwind and downhill of where birds live. Old litter is a concentrated reservoir of coccidiosis oocysts, worm eggs and bacteria — how you handle it is covered in our guide to poultry litter management.
- Dry clean everything. Sweep and brush down walls, rafters, wire, fans, curtains and ledges to remove dust, feathers and cobwebs. Dust carries virus and bacteria, so do not skip the overhead surfaces just because they look "cleaner" than the floor.
- Wash with detergent. Wet the surfaces, apply a detergent, and scrub or pressure-wash to lift the greasy film that protects germs. Inspect, and wash again anywhere it is not visibly clean. This is the step that most farms rush and most need.
- Let it dry. Allow surfaces to dry before disinfecting where the product calls for it — a dripping-wet surface dilutes the disinfectant you are about to apply.
- Disinfect. Apply an appropriate disinfectant at the correct dilution, top-to-bottom and back-to-front, keeping surfaces wet for the full contact time the label states.
- Dry out and rest. Let the house dry completely, then rest it empty until the next flock, ideally within a controlled downtime window.
Field note: the drinker lines and feeders are where germs hide
The surfaces keepers most often under-clean are the ones birds put their mouths on. Drinker lines and nipples build up a slippery biofilm on the inside that ordinary rinsing does not shift, and feeders trap old, greasy feed in their corners — both are perfect refuges for bacteria that then greet the next flock at the water and feed. On the farm we take drinkers and feeders right out of the house, scrub them, and flush the water lines rather than just wiping what we can see. A house with spotless walls but a slimy drinker line is not a clean house. If a surface touches feed or water, it deserves the most attention, not the least.
Choosing and using a disinfectant
No disinfectant works on a dirty surface, and no disinfectant works instantly — those are the two rules that matter most. Beyond that, use a product suited to poultry housing, mix it at the concentration the label specifies (stronger is not better and wastes money; weaker simply fails), and respect the conditions it needs. Cobb Genetics notes that most disinfectants perform best above about 20°C, which is rarely a problem in Ghana, and that where fumigation is used it works best at a relative humidity of 70-80% and a house temperature around 21°C. Formalin-based treatments, where used, are applied at defined dilutions — Cobb cites a 4% end solution for certain applications — and must only be handled with proper ventilation and protection, as formaldehyde is hazardous. Whatever product you choose, the discipline is the same: clean first, mix correctly, cover every surface, and leave it wet long enough to work.
Contact time: the step everyone rushes
If cleaning is the step farms skip, contact time is the step they cut short. Disinfectants do not kill on contact like a switch — PoultryBiosecurity.org is emphatic that "microorganisms are inactivated or killed by disinfection products gradually, not instantaneously," and that "areas being disinfected should remain wet with the disinfectant during the necessary contact time." That contact time is set on the product label and varies by product; a disinfectant that has dried on the surface after two minutes, when its label calls for ten minutes of wet contact, has simply not done its job. In our warm, breezy houses surfaces dry fast, so the practical challenge is keeping them wet long enough — which may mean applying enough volume, working in shade or cooler hours, or re-wetting large surfaces. The disinfectant is only killing germs while it is still wet on the surface. Treat the contact time as the actual disinfection, not the spraying.
| Step | What you do | Why it matters |
|---|---|---|
| 1. Dry clean | Remove all litter, manure, dust, feathers | Organic matter shields and inactivates disinfectant |
| 2. Wash | Detergent wash, scrub, rinse; repeat if not clean | Lifts the greasy film germs hide under |
| 3. Dry | Let surfaces dry before disinfecting | Stops the disinfectant being diluted on contact |
| 4. Disinfect | Correct dilution, top-to-bottom, back-to-front | Kills the germs cleaning left behind |
| 5. Dry out & rest | Full dry-out, then downtime before restocking | Birds meet a clean, dry house, not a damp one |
Don't forget the surroundings and equipment
A spotless house sitting in a dirty compound is only half-clean, because germs, flies and rodents will carry contamination straight back in. The area immediately around the house matters: clear rubbish, cut back weeds, and keep a clean apron of ground at the entrances. Equipment cleaned outside — feeders, drinkers, brooder guards, egg trays, crates — should be washed and disinfected to the same standard as the house and kept off the ground while it dries, not stacked back onto contaminated soil. Water systems deserve particular care: flush and disinfect drinker lines and tanks, because a biofilm inside the plumbing re-seeds every drink the new flock takes. Vehicles, boots and hands are the other overlooked routes; a foot dip with fresh disinfectant at the door, and dedicated boots for the clean house, keep your hard-won C&D from being undone the moment someone walks in. Good ventilation during and after cleaning also speeds the all-important dry-out — our guide to poultry house ventilation covers moving air through the building.
Drying and downtime: finishing the job
C&D is not finished when the disinfectant goes on — it is finished when the house is dry and has been rested. A house restocked while still damp hands the new flock exactly the warm, moist surfaces that bacteria, moulds and coccidiosis thrive on, undoing much of the cleaning. Cobb Genetics recommends letting all house surfaces dry, noting that the best point to check a house is two to three days after disinfection once everything has dried, and that biosecurity is maintained when the gap between finishing C&D and introducing the new flock is kept controlled — generally under about 14 days. In practice this means building the dry-out and rest into your turnaround schedule rather than restocking the moment the spraying stops. The empty, dry, rested house is the goal; the cleaning and disinfecting are how you get there.
Field note: check your work before the chicks arrive
The honest way to know whether a C&D was any good is to inspect the empty house the way a chick would meet it — low down and in the corners. We walk the house before restocking and look at the places that are easy to miss: the underside of drinker lines, the corners where wall meets floor, behind and inside fans, the seams of curtains. If a surface still shows a greasy film, caked dirt or a musty smell, it was not cleaned properly and disinfectant will not have fixed it — so it gets done again before any bird arrives. A quick, honest inspection at the end costs minutes and catches the shortcuts that would otherwise cost you a struggling flock.
The bottom line on cleaning and disinfecting
Cleaning and disinfecting a poultry house between flocks is not one job but a sequence, and the sequence is the whole point. Dry clean to strip out the organic matter that would otherwise inactivate your disinfectant; wash with detergent to lift the film germs hide under; dry the surfaces; then disinfect at the correct dilution, top-to-bottom and back-to-front, keeping every surface wet for the full contact time on the label; and finally dry out and rest the house before restocking. Done in that order, C&D cuts the microbial load on your surfaces by around 90% and hands each new flock a genuinely clean, dry start. Done out of order — disinfectant sprayed over dirt, contact time cut short, chicks moved into a damp house — it looks like work but changes almost nothing. Respect the order, respect the contact time, and respect the dry-out, and this one routine will do more to keep your flocks healthy than any medicine you can buy.
Frequently asked questions
What is the correct order to clean and disinfect a poultry house?
Why can't I just spray disinfectant without cleaning first?
How long should disinfectant stay on the surface?
How much does proper cleaning and disinfection reduce germs?
Do I need to clean the drinkers, feeders and water lines too?
How long should the house dry and rest before new chicks arrive?
Does temperature or humidity affect how well disinfectant works?
Should I clean the area around the house as well?
Sources & further reading
- PoultryBiosecurity.org — Information on Cleaning and Disinfection (five-step C&D sequence, organic matter inactivating disinfectants, contact time).
- Cobb Genetics — Disinfection of Poultry Breeder Houses (top-to-bottom/back-to-front order, ~90% microbial reduction, temperature and humidity conditions, drying and downtime).
- Agro Prime Ghana guides: poultry biosecurity, poultry litter management, and poultry house ventilation.
About Agro Prime Ghana
Agro Prime Ghana Limited runs a poultry hatchery and mixed agribusiness in Kasoa, supplying day-old chicks and supporting poultry keepers nationwide. These guides combine hands-on hatchery and farm experience with current industry and veterinary references. This article is general educational information; always follow the label instructions and safety guidance for any disinfectant you use, and seek professional advice for serious disease problems. Need chicks, feed advice or farm support? Book a visit or message us on WhatsApp (+233 24 915 1503).